Wednesday, 15 February 2017

Microsoft Azure - Fabric Controller

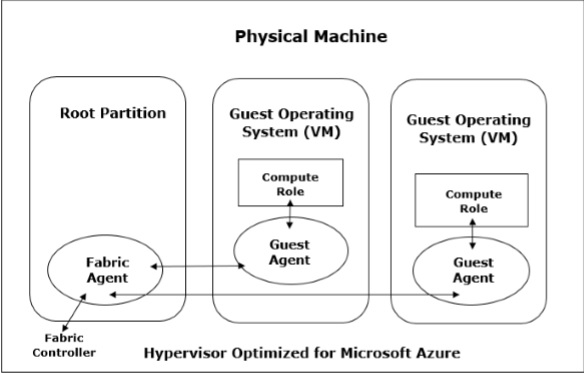
Fabric Controller is a significant part of Windows Azure architecture. When thinking of the components or services provided by Windows Azure, we wonder how all this works and what is happening in clouds. It seems very complex from our end. Let us look into the physical architecture of these services to have a better understanding of Fabric Controller.
Fabric Controller
Inside the datacenter, there are many machines or servers aggregated by a switch. We can say that fabric controller is a brain of the azure service that analyses the processes and makes decisions. Fabrics are group of machines in Microsoft’s datacenter which are aggregated by a switch. The group of these machines is called cluster. Each cluster is managed and owned by a fabric controller. They are replicated along with these machines. It manages everything inside those machines, for e.g., load balancers, switches, etc. Each machine has a fabric agent running inside it and fabric controller can communicate with each fabric agent.
When selecting a virtual machine offered by Windows Azure services, there are five options to choose from. The configuration is as follows −
MemoryCPUInstance Storage
Extra Small768 MBSingle core 1.0 GHz20 GB
Small1.75 GBSingle core 1.6 GHz225 GB
Medium3.5 GBDual core 1.6 GHz490 GB
Large7 GBFour core 1.6 GHz1,000 GB
Extra Large14 GBEight core 1.6 GHz2,040 GB
When a user chooses one of the virtual machine, the operating system, patch updates and software updates are performed by fabric controller. It decides where the new application should run which is one of the most important functions of Fabric Controller. It also selects the physical server to optimize hardware utilization.
When a new application is published in Azure, an application configuration file written in XML is also attached. The fabric controller reads those files in Microsoft datacenter and makes the setting accordingly.
In addition to managing the allocation of resources to a specific application, it also monitors the health of compute and storage services. It also makes the failure recoveries for a system.
Imagine a situation where four instances of web role are running, and one of them dies. The fabric controller will initiate a new instance to replace the dead one immediately. Similarly, in case any virtual machine fails, a new one is assigned by the fabric controller. It also resets the load balancers after assigning the new machine, so that it points to the new machine instantaneously. Thus, all the intelligent tasks are performed by the Fabric Controller in Windows Azure architecture.

Microsoft Azure - Backup & Recovery

Azure backup can be used to backing up on-premise data in cloud. Data is stored in an encrypted mode. The following sections provide a detailed illustration of how to do it using Azure. In this process, we will first create a backup vault where our data will be stored and then see how data can be backed up from our on-premise computer. The backup agent which is installed on the computer, first encrypts the data and then sends it over the network to the storage place in Azure. Your data is completely safe and secure.

Create Backup Vault

Step 1 − Login into your management portal.
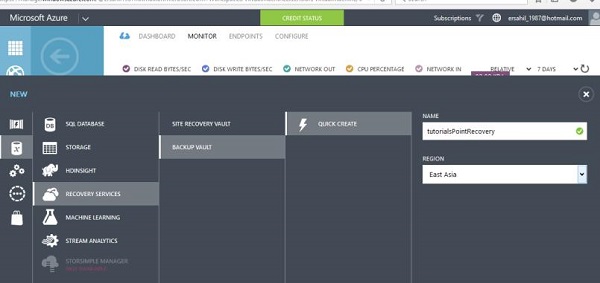
Step 2 − At the bottom right corner, select New → Data Services → Recovery Services → Backup Vault → Quick Create.
Create Backup Vault
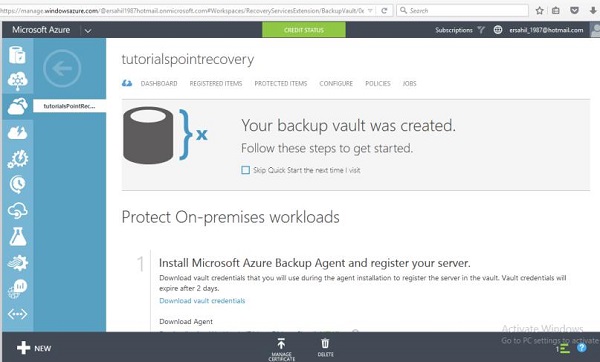
Step 3 − Enter the name of vault and select the region. It will be created and displayed in your management portal.
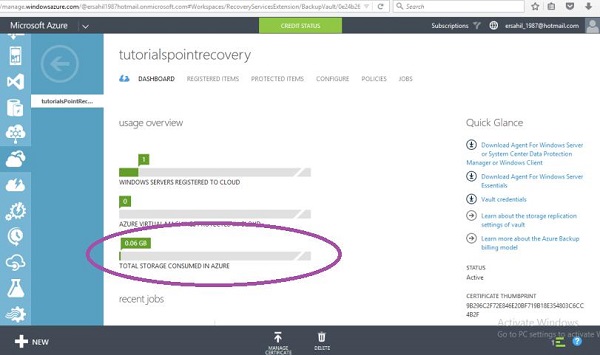
Step 4 − Select the vault and click ‘Download Vault Credentials’ as shown in the following image.
Create Backup Vault
Step 5 − It will save a credential file on your computer.
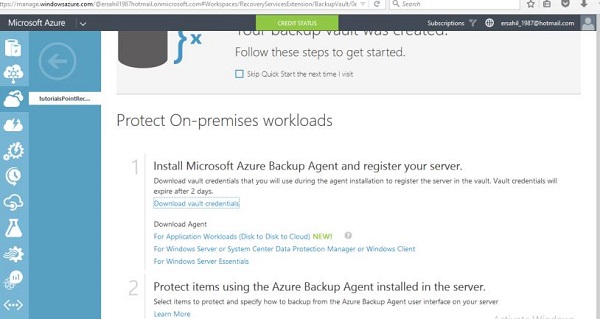
Step 6 − Now scroll down the same page in Azure and you will see three options under ‘Download Agent’. Select a suitable option. Let’s choose the third option in the list in this example.
Create Backup Vault
Step 7 − Agent’s setup will be saved on your computer. You will have to install it by following the wizard. There is nothing very specific in the installation process.
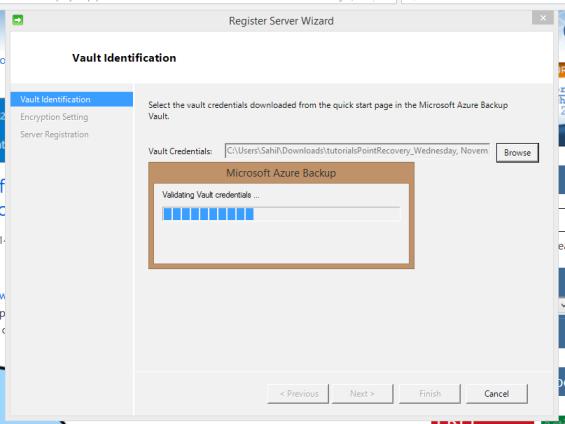
Step 8 − At the end of the installation, you will see a button at the bottom of pop-up window ‘Proceed to Registration’. Click that button and the following screen will appear.
Step 9 − First step is vault identification. Browse the credentials file on your computer which was saved in the last step.
Vault Identification
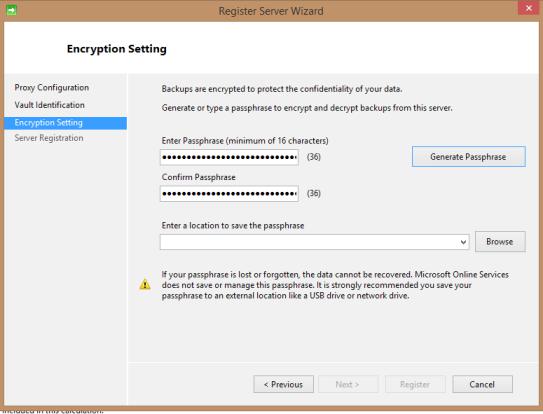
Step 10 − Next step in the registration wizard is choosing the encryption setting. You can enter your own passphrase or let the wizard generate it by itself. Here let’s choose ‘Generate Passphrase’.
Step 11 − Browse for the location where you want to save the passphrase. Keeping this passphrase file safe is very important as you won’t be able to restore backups without it.
Encryption Setting
Step 12 − Click on Next and the file will be saved on your selected location.

Schedule a Backup

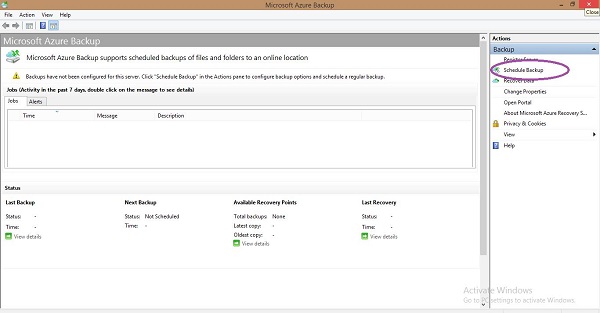
After the wizard in the above section is finished, you will see the following program that was installed in the previous step, running on your computer. You will come across selecting the data folder from your computer you want to back up on Azure and the frequency of backup in this wizard.
Step 1 − Click ‘Schedule Backup’ from the right panel.
Schedule a Backup
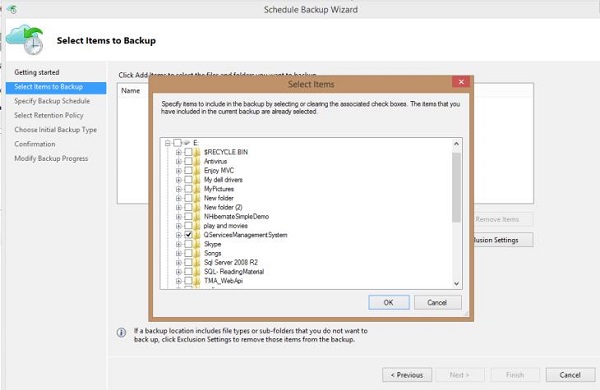
In this example, let’s select the data folder named ‘QServicesManagementSystem’.
Schedule a Backup
Follow the steps as pop up on the screen and are quite understandable. You are allowed to back up 3 times maximum and you can choose from daily and weekly frequency.
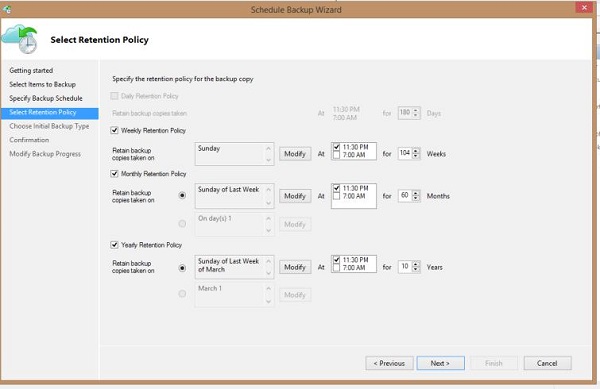
Step 2 − In the following step, select how long you want to keep the backup in your online storage. Set it according to your need.
Schedule a Backup
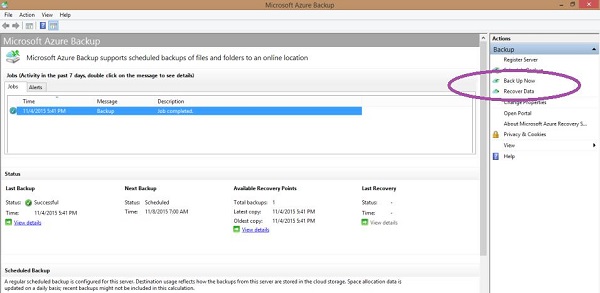
Step 3 − You can choose the ‘Backup Now’ in the left panel of backup agent. It will save a copy of your data that very moment. Then you can see it in your management portal by selecting the backup vault and going to its dashboard.
Schedule a Backup
You can see in the following image that there is one item listed under ‘Jobs’ section as data has been backed up by selecting ‘backup now’. This section will display all the activities in backup task. Details of the backup schedule is displayed under ‘Status’ section.
Step 4 − You can recover the data by selecting ‘Recover Data’ in backup agent and following the wizard.
Recover Data

Microsoft Azure - Management Portal

As the name suggests this is a portal to manage Azure services, which was released in 2012. This is a platform provided by Microsoft for its Azure clients where they can see, manage and buy the services offered by Azure. A different portal called ‘Azure Preview Portal’ was released by Azure team in 2014, which makes it easier to access the platform on mobiles and tablets. However, features are more or less same in both the portals.
To access the management portal −
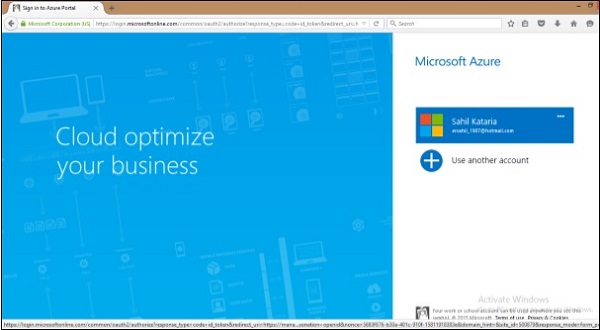
Step 2 − Sign in with your Hotmail or live ID. If you don’t have Azure accounts, sign up for one. You will get a free trial and you can explore, learn and create your own applications using Windows Azure.
Management Portal
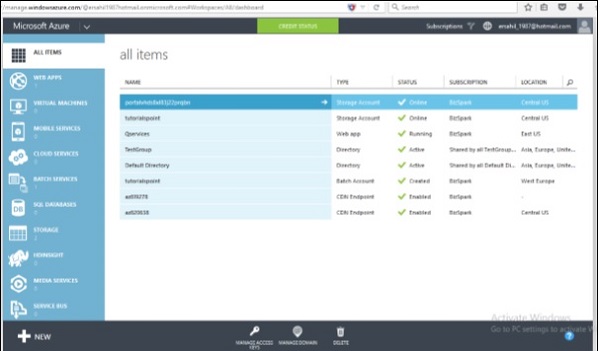
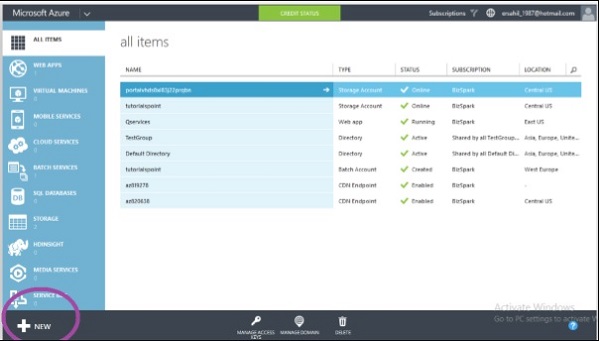
The following screen will appear.
Management Portal
Since here we have an application already running, you can see a list of them. Your account will be empty for the first time. Left panel categorizes the application and the middle part lists all the application in the account.

Create a New Application

Step 1 − Click on the ‘New’ left bottom corner.
Management Portal Create New
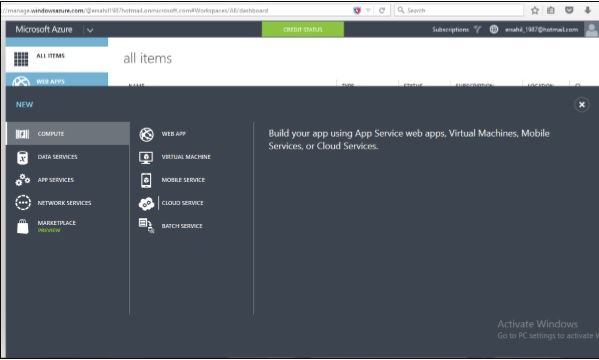
Step 2 − Following screen will come up and you can choose what you want to create.
Management Portal Create New

Check Credit and Subscriptions

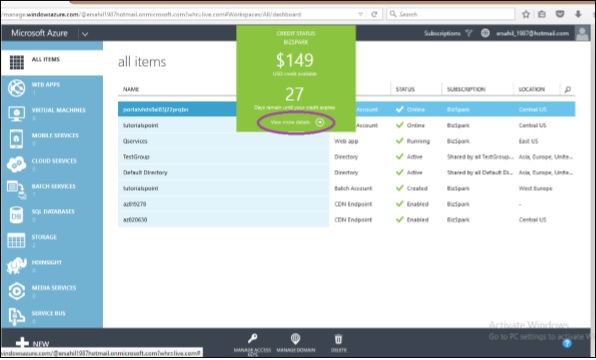
Step 1 − Click on ‘Credit’ in the green block at the top of the screen.
Management Subscriptions
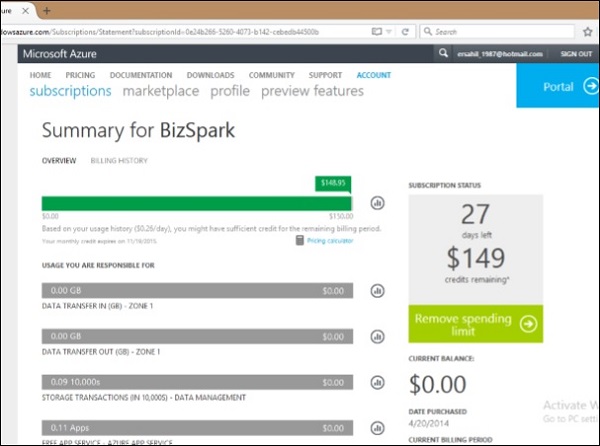
Step 2 − Click on ‘View more details’. It will take you to the following screen. This screen will show you all the details of your subscription, spending, and data usage.
Subscriptions Details
As the spending limit is set here, it says ‘Remove Spending Limit’. If the limit would not have been set, it would have said ‘Set Spending Limit’. This way you can set a spending limit for you. Your services will be stopped once you reach the spending limit.
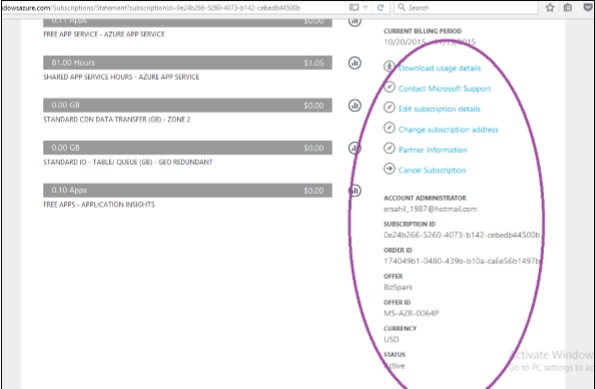
If you scroll down on the page in the above image, you can see all that is available with your subscription and see the details on the right side.
Account Administrator
You are absolutely in control of your spending. The green block in which ‘Credit’ button is displayed will change color if you are about to fall short of your credit. This is calculated by your average per day spending and it would tell you in how many days your credit is going to get over.

Add a New Subscription

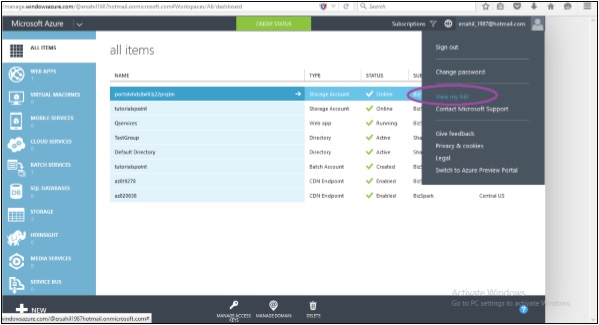
Step 1 − Click on your account e-mail id or on the picture at the top right corner.
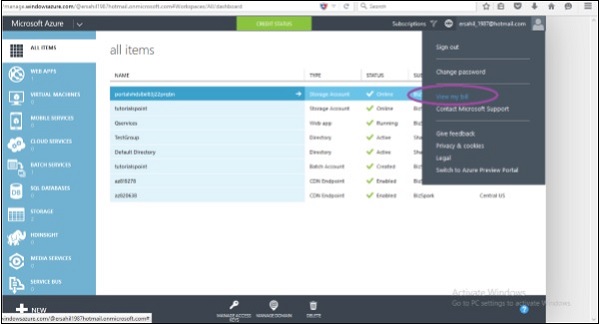
Step 2 − Click on ‘View my bill’ in the list.
View My Bill
Step 3 − It will take you the following screen. Click on ‘add subscription’.
Management Add Subscriptions
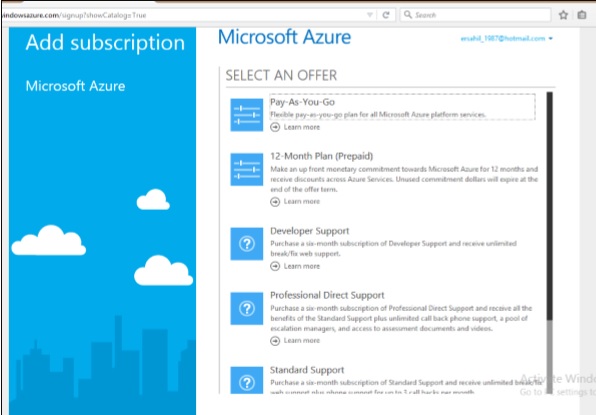
Step 4 − Choose the subscription from the list in the following screen.
Choose Subscriptions

Azure Preview Portal

Step 1 − Click on your account e-mail at the top right corner.
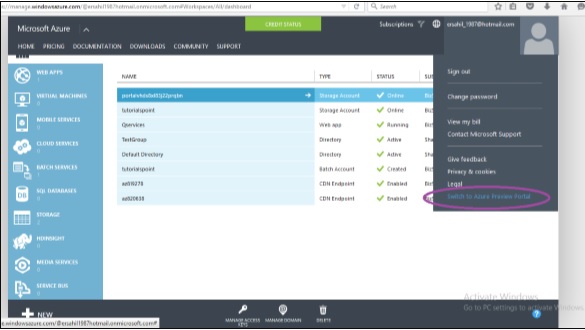
Step 2 − Select ‘Switch to Azure Preview Portal’.
Preview Portal
Step 3 − The following screen will appear. All the functionalities are same. ‘Azure Preview Portal’ is built for mobile and tablet screen with a responsive design.

Build and Release Agents In VSO

To build your code or deploy your software you need at least one agent. As you add more code and people, you'll eventually need more.
When your build or deployment runs, the system begins one or more jobs. An agent is installable software that runs one build or deployment job at a time.

Hosted agents

If you're using Team Services, you've got the option to build and deploy using a hosted agent. When you use a hosted agent, we take care of the maintenance and upgrades. So for many teams this is the simplest way to build and deploy. You can try it first and see if it works for your build or deployment. If not, you can set up a private agent.
NOTE
Hosted agents are available only in Team Services, not in Team Foundation Server (TFS).
We provide hosted agents to you in the hosted pool. If you need to run more than one job at a time, you'll need to get more concurrent pipelines.
Learn more about hosted agents.

Private agents

An agent that you set up and manage on your own to run build and deployment jobs is a private agent. You can use private agents in Team Services or Team Foundation Server (TFS). Private agents give you more control to install dependent software needed for your builds and deployments.
You can install the agent on Windows, Linux, or OSX machines. You can also install an agent on a Linux Docker container.
After you've installed the agent on a machine, you can install any other software on that machine as required by your build or deployment jobs.

Install and connect to Team Services and TFS 2017

TIP
Is your code in Team Services? If so, before you install an agent you might want to see if the hosted pool will work for you. In many cases this is the simplest way to get going. 
  • Windows agent v2
  • OSX agent
  • Ubuntu 14.04 agent
  • Ubuntu 16.04 agent
  • RedHat agent

Install and connect to TFS 2015

  • Windows agent v1
  • OSX agent
  • Ubuntu 14.04 agent
  • Ubuntu 16.04 agent
  • RedHat agent

Concurrent pipelines for private agents

You might need more concurrent pipelines to use multiple agents at the same time:
  • Concurrent pipelines in Team Services
  • Concurrent pipelines in TFS

Agent capabilities

Every agent has a set of capabilities that are indicative of what it can do. Capabilities are name-value pairs that are either automatically discovered by the agent software, in which case they are called system capabilities, or those that you define, in which case they are called user capabilities.
The agent software automatically determines various system capabilities such as the name of the machine, type of operating system, and versions of certain software installed on the machine. Also, environment variables defined in the machine automatically appear in the list of system capabilities.
When you author a build or release definition, or when you queue a build or deployment, you specify certain demands of the agent. The system sends the job only to agents that have capabilities matching the demands specified in the definition. As a result, agent capabilities allow you to direct builds and deployments to specific agents.
You can view the system capabilities of an agent, and manage its user capabilities by navigating to the Agent pools hub and selecting the Capabilities tab for the desired agent.
  • Team Services: https://{your_account}.visualstudio.com/_admin/_AgentPool
  • TFS 2017: https://{your_server}/tfs/_admin/_AgentPool
  • TFS 2015: http://{your_server}:8080/tfs/_admin/_AgentPool
The TFS URL doesn't work for me. How can I get the correct URL?

Agent communication

Communication with Team Services or TFS

Team Services or TFS 2017

The agent communicates with Team Services or TFS to determine which job it needs to run, and to report the logs and job status. This communication is always initiated by the agent. All the messages from the agent to Team Services or TFS happen over HTTP or HTTPS, depending on how you configure the agent. This pull model allows the agent to be configured in different topologies as shown below.
Agent topologies
Here is a common communication pattern between the agent and Team Services or TFS.
  1. The user registers an agent with Team Services or TFS by adding it to an agent pool. You need to be an agent pool administrator to register an agent in that agent pool. The identity of agent pool administrator is needed only at the time of registration and is not persisted on the agent, nor is used in any further communication between the agent and Team Services or TFS. Once the registration is complete, the agent downloads a listener OAuth token and uses it to listen to the job queue.
  2. Periodically, the agent checks to see if a new job request has been posted for it in the job queue in TFS/Team Services. When a job is available, agent downloads the job as well as a job-specific OAuth token. This token is generated by TFS/Team Services for the scoped identity selected on the general tab of the build definition. That token is short lived and is used by agent to access (e.g., source code) or modify resources (e.g., upload test results) on Team Services or TFS within that job.
  3. Once the job is completed, agent discards the job-specific OAuth token and goes back to checking if there is a new job request using the listener OAuth token.
The communication between the agent and TFS/Team Services is secured using asymmetric encryption over and above HTTPS. Each agent has a public-private key pair, and the public key is exchanged with the server during registration. Server uses the public key to encrypt the payload of the job before sending it to the agent. The agent decrypts the job content using its private key. This is how secrets stored in build definitions, release definitions, or variable groups are secured as they are exchanged with the agent.

TFS 2015

In TFS 2015:
  • An agent pool administrator joins the agent to an agent pool, and the credentials of the service account (for Windows) or the saved user name and password (for OSX and Linux) are used to initiate communication with TFS. The agent uses these credentials to listening to the job queue.
  • The agent does not use asymmetric key encryption while communicating with the server. However, you can use HTTPS can to secure the communication between the agent and TFS.

Communication to deploy to target servers

When you use the agent to deploy artifacts to a set of servers, it must have "line of sight" connectivity to those servers. The hosted pool, by default, has connectivity to Windows Azure websites and Windows servers running in Azure.
If your on-premises environments do not have connectivity to the hosted pool (which is typically the case due to intermediate firewalls), you'll need to manually configure a private agent on on-premises computer(s). The agents must have connectivity to the target on-premises environments, and access to the Internet to connect to Team Services or Team Foundation Server, as shown in the following schematic.
Agent connectivity for on-premises environments

Agent registration

To register an agent, you need to be a member of the administrator role in the agent pool. Your agent can authenticate to Team Services or TFS using one of the following methods:
  • Personal Access Token (PAT): Generate and use a PAT to connect an agent with Team Services, TFS 2017, or TFS 2015 Update 3. PAT is the only scheme that works with Team Services.
  • Integrated: Connect a Windows agent to TFS using the credentials of the signed-in user via a Windows authentication scheme such as NTLM or Kerberos.
  • Negotiate: Connect to TFS as a user other than the signed-in user via a Windows authentication scheme such as NTLM or Kerberos.
  • Alternate: Connect to TFS using Basic authentication. To use this method you'll first need to configure HTTPS on TFS.

Interactive vs. service

You can run your agent as either a service or an interactive process. After you've configured the agent, we recommend that you first try it in interactive mode to make sure it works. Also, in some cases you might need to run the agent interactively for production use. For example, if you need to run an elevated process or run UI tests.
After you've verified that the agent is working, for production use, we recommend that you run the agent as a service. The main advantage is that the agent stays more reliably in a running state. For example, it starts automatically when you restart the machine and after some kinds of failures. You can leverage the service manager of the operating system to manage the life cycle of the agent. Also, the experiences for auto-upgrading agents are better when they are run as services.
Whether you run an agent as a service or interactively, you can choose which account you use to run the agent. Note that this is different from the credentials that you use when you register the agent with Team Services or TFS. The choice of agent account depends solely on the needs of the tasks running in your build and deployment jobs. For instance, to run tasks that use Windows authentication to access an external service, you need to run the agent using an account that has access to that service.

Agent version and upgrades

We update the agent software every few weeks in Team Services, and with every update in TFS. We indicate the agent version in the format {major}.{minor}. For instance, if the agent version is 2.1, then the major version is 2 and the minor version is 1. When a newer version of the agent is only different in minor version, it is automatically upgraded by Team Services or TFS. This upgrade happens when one of the tasks requires a newer version of the agent.
If you run the agent interactively, or if there is a newer major version of the agent available, then you have to manually upgrade the agents. You can do this easily from the agent pools tab under your team project collection or account.
You can view the version of an agent by navigating to the Agent pools hub and selecting the Capabilities tab for the desired agent.
  • Team Services: https://{your_account}.visualstudio.com/_admin/_AgentPool
  • TFS 2017: https://{your_server}/tfs/_admin/_AgentPool
  • TFS 2015: http://{your_server}:8080/tfs/_admin/_AgentPool

Microsoft Azure - Data Import & Export Job

This is very useful service for the clients in case a large amount of data cannot be accessed over the network from their storage account. Azure gives an option to its clients that they can put their data on a hard drive and ship them to Azure datacenters. That data is then uploaded to their storage account. Similarly, if data is needed to be downloaded by the client that is not viable to do over the network, they can ship an empty hard drive to the datacenter and Azure team will copy the data to that drive and ship it back to the client. In both cases, the data is encrypted.

Data Export Job

Let’s assume you have a large amount data in your Azure storage account and you want a copy of that data.

Create an Export Job

In this process, you will be given a shipping address, to where the empty hard drives needs to be shipped.
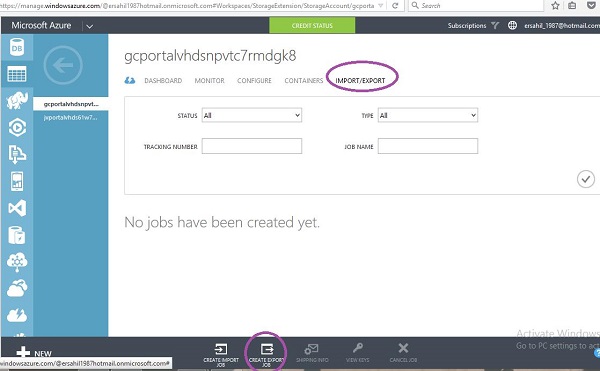
Step 1 − Login to Azure management portal and select the ‘Storage’ from the left panel.
Step 2 − Select the storage account.
Step 3 − Click ‘Import/Export’ from the top menu.
Step 4 − Create ‘Export Job’.
Create Export Job
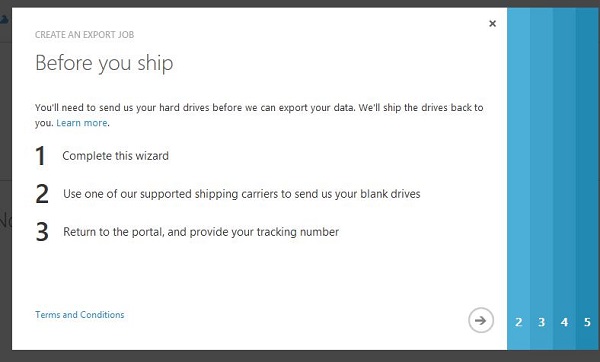
The following screen will pop up.
Create Export Job
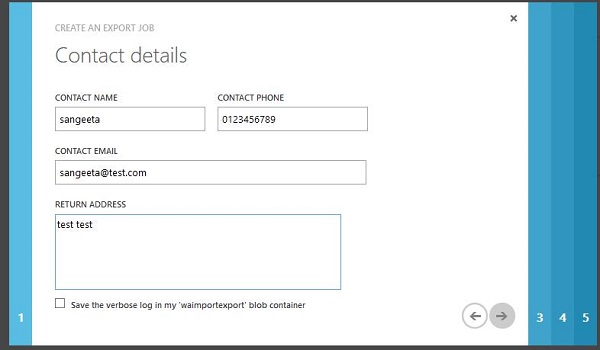
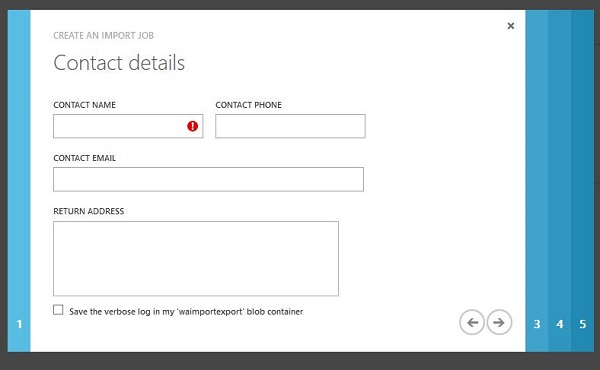
Step 5 − On clicking the next arrow, you will see the following screen, where you will have to provide your contact and shipping details.
Contact Details
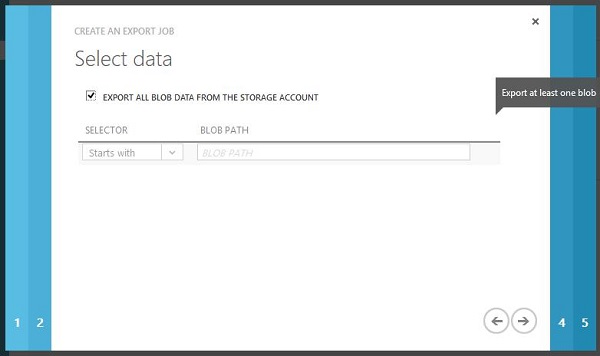
Step 6 − In the next screen, you will have to select the Blob Data you want to export. You can specify the path or choose to export all blob data from the storage account.
Select Data
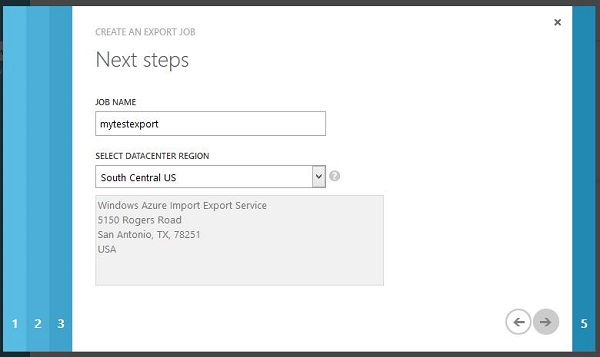
Step 7 − Enter a name for job in lower case letters. Address you can see here is the address where the hard drives is to be shipped. This address is based on the location of my storage account.
Next Steps
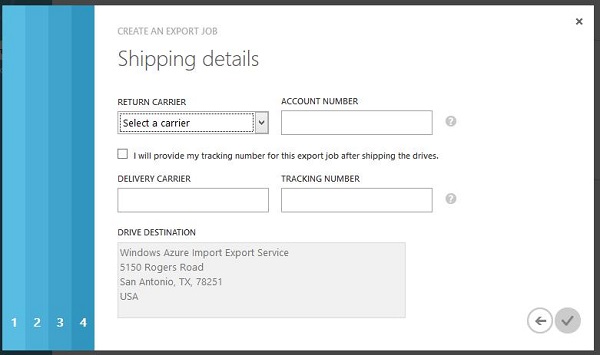
Step 8 − In the next step, you will have to provide the shipping details of the hard drive for delivery to datacenter and return to your location.
Create Export Job
Step 9 − Click next and you are done.

Hard Drives to Be Shipped

In order to determine how many hard drives you need for the Blob data, you will have to use Microsoft Azure Import/Export Tool. You will have to download and install this tool on your machine. Only 3.5 inch SATA hard drive I/II are up to 6TB supported.
Ship the Hard Drives

You need to ship the hard drives to the shipping address obtained while creating the export job. Then you need to come back to the management portal to enter the tracking number, in case you chose to provide the tracking number after shipping in the screen above.

Decrypt the Data

You will have to enter the decryption key before reading the data on hard drives. You can get the decryption key from your management portal by selecting the job name.

Data Import Job

If you want to store the large amount of data to your storage account, you can do so by saving it on the hard drive and shipping it to the datacenter.

Prepare the Hard Drives

You will have to use Microsoft Azure Import/Export Tool to prepare the hard drives. As mentioned in earlier section, the only 3.5 inches SATA hard drives are supported for this purpose. This process will create a drive journal file that you will need while creating the import job in management portal. The journal file will be saved on your computer.
Create Import job

Step 1 − Login into the management portal and go to the storage account.
Step 2 − Select ‘import/export’ at the bottom of the screen.
Step 3 − Select ‘Create Import Job’.
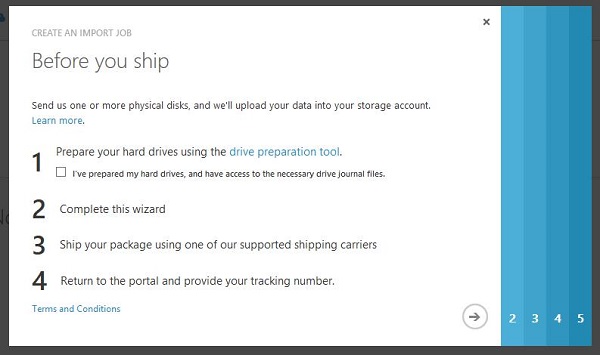
Step 4 − Check the checkbox and click Next.
Create Import Job
Step 5 − In the next screen, provide the contact details of the return shipping address. Enter the details and click Next.
Create Import Job
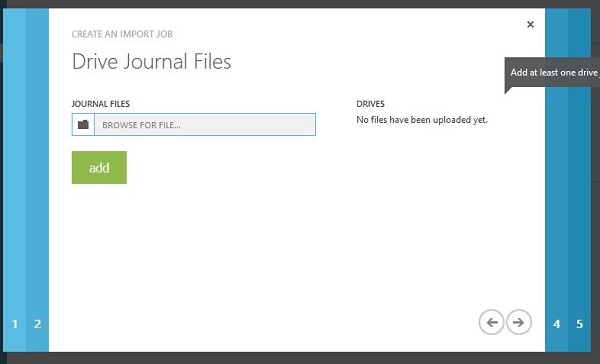
Step 6 − Upload the Drive Journal File that was created while preparing the hard drive.
Journal Files
Step 7 − Enter the name for import job.
Step 8 − Enter the shipping details for the delivery of hard drives to the datacenter and return to your location.

Ship the Hard Drives to the Datacenter

Ship the hard drive to the address obtained while creating import job in the management portal. Enter the shipping tracking number for the job in the management portal in order to complete the job.

Tuesday, 14 February 2017

Microsoft Azure - CDN

Caching is one of the ways for performance improvement. Windows Azure uses caching to increase the speed of cloud services. Content Delivery Management (CDN) puts stuff like blobs and other static content in a cache. The process involves placing the data at strategically chosen locations and caching it. As a result, it provides maximum bandwidth for its delivery to users. Let’s assume an application’s source is far away from the end user and many tours are taken over the internet to fetch data; the CDN offers a very competent solution to improve performance in this case. Additionally, it scales the instant high load in a very efficient manner.

Create a CDN

Step 1 − Login in to your Azure Management Portal.
Step 2 − Click on 'New' at bottom left corner.
Step 3 − Select ‘APP Services’ then ‘CDN’.
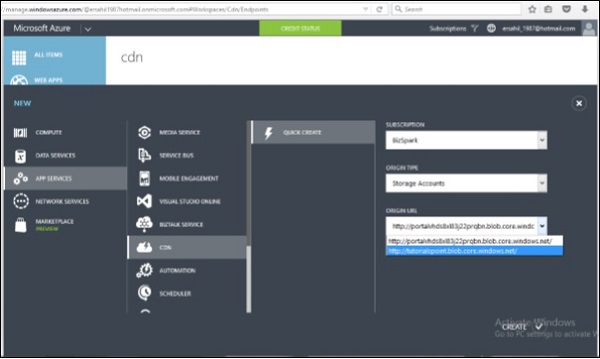
Step 4 − Click on ‘Quick Create’. The following screen will come up.
Create a CDN
You will see three fields in the pop up −
  • Subscription − There will be a list of subscriptions you have subscribed to and you can choose from one of them. In this demo, only one option was there in the subscription dropdown, which was ‘BizSpark’, the current subscription.
  • Origin Type − This dropdown will ask to select an origin type. The integrated service will have an option of Web Apps, Cloud Services, Storage and Media Services.
  • Origin URL − This will show the URLs based on the chosen origin type in the dropdown.
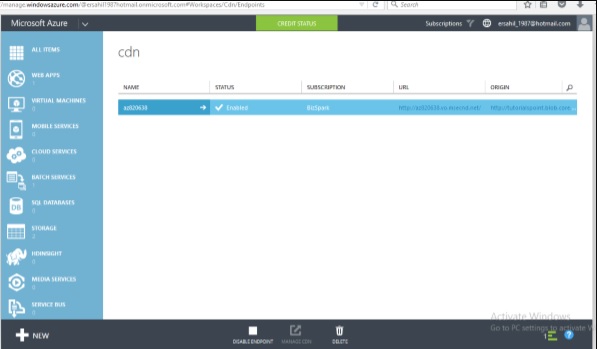
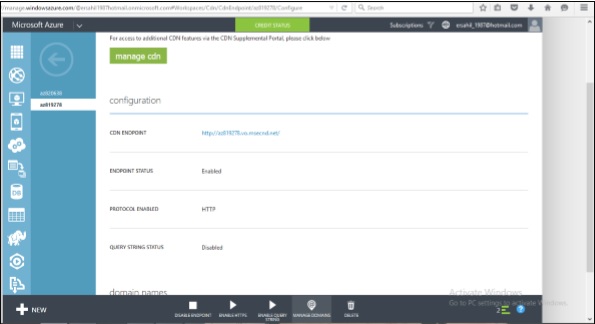
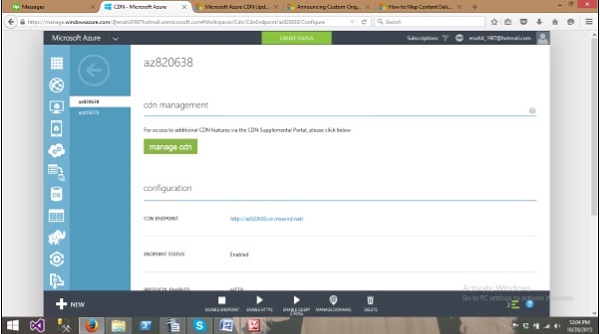
Step 5 − Choose one of the options from each dropdown as needed and click ‘Create’. CDN endpoint is created as show in the following image.
Create a CDN Step5

Create CDN for Custom Origin Links

In June 2015, CDN was updated with one more feature where users can specify a custom origin. Earlier only Azure services could be linked to CDN, but now any website can be linked to it using this service.
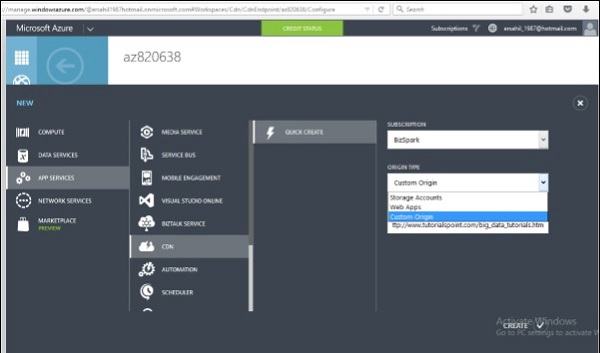
When we are create a CDN service, in the ‘Origin Type’ dropdown, there is an option ‘Custom Origin’ as shown in the following image, and then you can specify the link in the URL field.
Create CDN for Custom Origin Links

Manage CDN

Step 1 − Click on the Name of the CDN you want to manage in the list displayed in CDN services.
Step 2 − Click on ‘manage cdn’.
Manage CDN
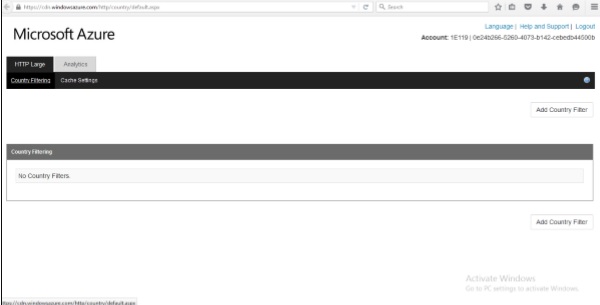
Country filtering − You can allow/bock your website in specified countries. This is going to protect your data for better.
Step 3 − When you click on ‘manage cdn’ you will be taken to the following page in a new tab of your browser.
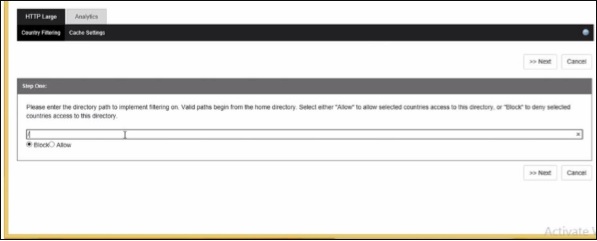
Step 4 − Click on ‘Country Filtering’ from menu items at the top of screen. Click on ‘Add Country Filter’ button as shown in the following image.
Manage CDN Step4
Step 5 − Specify the directory and select Allow/block.
Manage CDN Step5
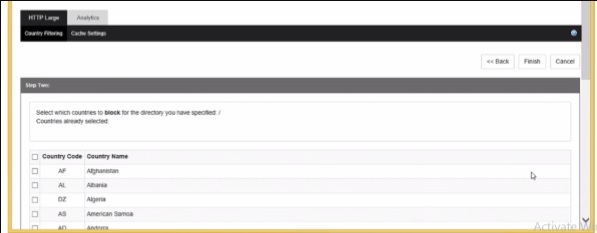
Step 6 − Select the country in the next screen and you are done.
Manage CDN Step6
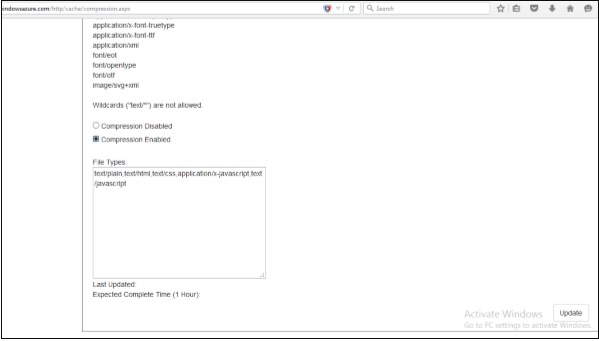
Compression − It allows files to be compressed. You can enable/disable compression. Also you can specify the file type.
Step 7 − Click on ‘Cache Setting’ and scroll down to the bottom of the page.
Step 8 − Select ‘Compression Enabled’ and click ‘Update’ button. By default, compression is disabled.
Manage CDN Step8
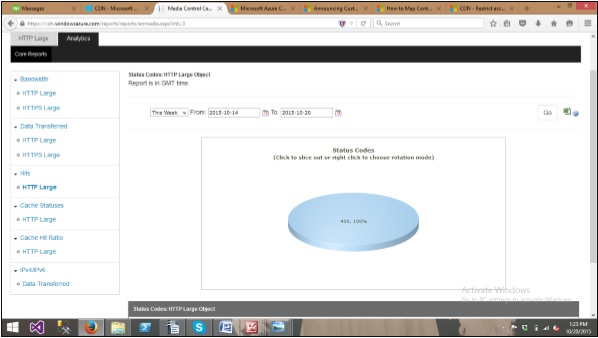
Analytics − You can see very useful figures in this section. For example, number of overall hits or in a specific geographic region. The report will also show how many times requests are served from CDN endpoints and how many of them are going back to the original server.
Step 9 − Click on ‘Analytics’ in menu items at the top of the page. You will see a list of all the reports in the left panel as shown in the following image.
Manage CDN Step9
Step 10 − Additionally, you can download the report as an excel file by clicking on the excel icon at the top right corner.

Map a Custom Domain Name

You might want to use a custom domain name instead of CDN endpoint that is autogenerated by Azure service. Windows Azure has provided a new feature that allows you to map a custom domain name to his application’s CDN endpoint. Let’s see how it is done in Azure Portal.
Step 1 − Click on ‘Manage Domain’ Button on the bottom horizontal menu.
Map CDN
Step 2 − Enter the custom URL in the text box and its done.